
A Planing Stop
I got a Benchcrafted Planing Stop as a gift a while ago. I had read about these stops for a long time but never used one. I suspected I would like them and I was not wrong. They are fantastic.
I found a nice hunk of my Douglas-Fir and made the base block. The stop is attached with bolts into a barrel nut. I also flushed it to the top of the block.

Then I carefully scribed where the mortise will go.

My bench top is 5" thick so I drilled out some of the waste. It’s sometimes easier to drill first before using chisels and floats.

After a lot of trimming the mortise is just the right size. The needs to be very snug so that you need to tap it with a hammer to move it. If it gets looser over time then I can add shims to the block or make a new one. If it gets too tight during humid times I can plane a little off the block.

One of the most useful tools for adjusting the planing stop mortise was my float from Lie-Nielsen. I tell everyone who hasn’t used one that a float is their favorite tool they don’t have yet.
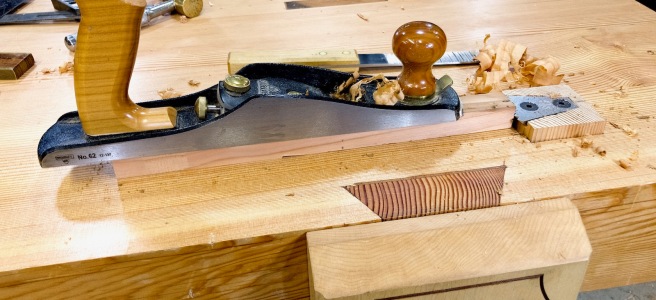
I also flushed the front teeth of the planing stop into the bench top.

A planing stop is used by tapping on the block from underneath until is sticks up just a little, but enough to prevent a piece of wood from moving. My block is about 12" long and the bench top is 5" thick. It can be raised several inches from the top surface if needed. When you’re done you just tap it back down flush. It’s always there ready to work, you don’t have to hunt for it and clamp it.

For shorter and smaller pieces using the stop by itself is usually enough. If you tap the work piece into the teeth of the stop a bit it won’t move easily. You can flip the wood over and pick it up for inspection without unclamping it or loosening a vise. This makes for a very quick workflow.

For larger wood I’ll use a Doe’s foot along with the planing stop. Mine are 1/8" hardboard with 80-grit PSA sandpaper on the back. The 90º notch on one end makes them very functional.

A Doe’s foot is used by holding it against the opposite end of the work piece and fixing it with a holdfast. The wood is held very firmly but is still easy to flip for planing both sides.

The speed of my planing workflow has been dramatically improved with this simple stop. The concept has been around for many centuries, even the Romans used them. I can see why it’s still popular.

I’m very happy with my final workbench. This thing is rock solid and extremely functional.
-Eric

I discovered floats a few years ago when I was making a set of wooden bench planes. I’ve found so many uses for them since then. Have you thought about adding a wooden spring to the side of your bench dog so you don’t have to be adjusting the fit for seasonal movement? This is what I was thinking: https://ibuildit.ca/wp-content/uploads/images/tips/bench-dogs%20(6).jpg
LikeLiked by 1 person
Do you mean the big block the planing stop is mounted on? That does not move that much. You want it to be very tight with a good whack of a mallet moving it only about 1/8″. I’ve only had to adjust it once by adding a strip of masking tape. I’m not using normal bench dogs at this point. I’m experimenting with doe’s feet and the planing stop only. I also have a nice twin-screw (Moxon) vise on a mini-bench for joinery.
I’m glad you like floats, they are really great tools and might be the most unknown hand tool group. Do you have blog I can follow? I looked for one and didn’t find anything.
LikeLiked by 1 person
No, I don’t have a website and only started doing social media again when the lockdowns started. I’m primarily a woodturner these days but have been doing “flat” woodworking for about 25 years. Got into handtools more seriously about 5 years ago.
LikeLiked by 1 person
What a fantastic workbench, thank you for sharing. As far as I could see, the whole project was completed using hand tools only, quite an achievement.
LikeLiked by 1 person
Thank you. I did use my bandsaw a bit but everything else was hand tools. That was a goal for this project and it was very satisfying. The bench has been in heavy use since 2019 and has been fantastic. I’m making guitars on it and having great retirement fun.
LikeLike